Open files in VS Code and Cursor / 3D and imaging
Read GeoTIFF coordinates in VS Code
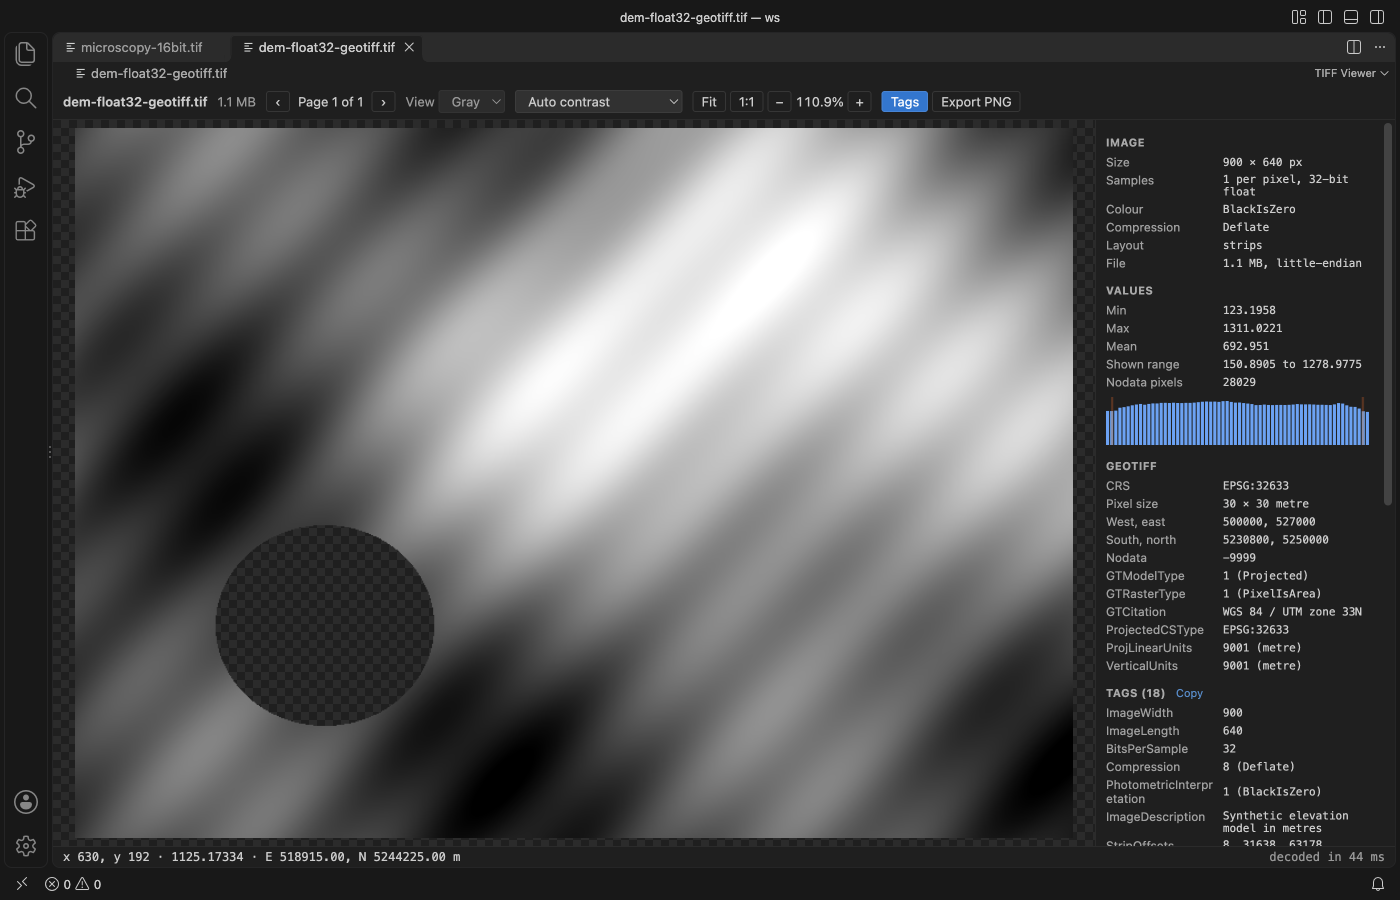
TIFF Viewer opens a GeoTIFF in VS Code and adds a GeoTIFF section to its side panel with the CRS as an EPSG code, the pixel size and units, the west, east, south and north bounds, the nodata value and every GeoKey by name. Move the pointer over the image and the line under it shows the pixel, its stored value, and the easting and northing, or the longitude and latitude for a geographic raster. All of it is free and works with no network. Zovo Pro (USD 19 once) adds statistics of a region you drag, with its map corners and a CSV, with 3 free tries.
Free, MIT license. Extension ID zovo.tiff-viewer, version 0.2.3. Needs VS Code 1.90.0 or newer.
Steps in VS Code
- Install TIFF Viewer from the Marketplace, or press Ctrl+P (Cmd+P on macOS) and run
ext install zovo.tiff-viewer. - Click the
.tifor.tifffile in the Explorer. If another viewer opens, right-click the file and pick "Open in TIFF Viewer". - Press Tags (or T) to open the side panel. When the page has ModelPixelScale, ModelTiepoint, ModelTransformation or GeoKeyDirectory tags, a GeoTIFF section lists the CRS, pixel size, bounds, nodata value and each GeoKey.
- Move the pointer over the image. The line under it shows x and y, the stored value, and the map coordinate of that pixel.
- Read the Values section for min, max and mean. Nodata and NaN pixels stay transparent and are left out of these numbers.
- Click Copy next to the Tags heading to put every tag on the clipboard as tab-separated text, for an issue or a note.
Where Zovo Pro saves time
Every page, the contrast stretches, pixel values, all tags, the GeoTIFF section, the coordinate readout and Export PNG of the page as shown are free, offline and without sign-in.
To check the values of one field, lake or tile, Region Statistics measures a rectangle you drag: pixel count, min, max, mean, standard deviation, percentiles and a histogram of the stored values, with nodata and NaN left out and counted. For a GeoTIFF it adds the map corners of the rectangle, and Save CSV writes one row per channel with the map bounds. The other Pro tools are Export pages, which saves PNG files with a .pgw world file and a GeoJSON footprint, and Batch convert for a folder.
With Region Statistics (Zovo Pro)
- Click Region stats in the toolbar, or run "TIFF Viewer: Region Statistics (Pro)" from the Command Palette.
- Drag a rectangle over the image. Escape cancels and uses no try.
- Read the numbers in the panel, then click Save CSV, or Measure again for another area.
Region Statistics works 3 times on your computer before it asks for a license, and a try counts only when you get a result. Opening a file shows no popup and no countdown.
Zovo Pro costs USD 19 once. It is not a subscription, and it turns on the Pro tools in every Zovo extension, not only TIFF Viewer. After a card payment (Stripe) your license key shows on the next page. In VS Code, run "Zovo Pro: Enter Zovo Pro license key" from the Command Palette and paste it. The key is checked on your computer, with no network call. With GitHub Sponsors, pick the "$19 one time" tier, then run "Zovo Pro: I already paid: unlock with GitHub Sponsors" and sign in with the same GitHub account. With PayPal, send USD 19 with "Zovo Pro" in the note and the key comes by email within a day.
A team of 5: USD 59 once, by card or by PayPal. Every rule and every Pro tool is on the Zovo Pro page.
Steps in Cursor, Windsurf or VSCodium
- Open the Extensions view with Ctrl+Shift+X (Cmd+Shift+X on macOS).
- Search for
zovo.tiff-viewerand click Install. Cursor, Windsurf and VSCodium install from Open VSX, where it is published aszovo/tiff-viewer. - If your editor has no gallery, download the .vsix from the Open VSX page and run "Extensions: Install from VSIX...".
- Then use it the same way as in VS Code.
What TIFF Viewer handles
- Projected rasters with easting and northing, and geographic rasters with longitude and latitude.
- Float32 and float64 elevation models, and 8, 16 and 32-bit integer data.
- The GDAL_NODATA tag, with nodata pixels shown as transparent.
- BigTIFF, tiled and striped files, and multi-page files.
What it does not do
- It shows no map tiles and does no reprojection. Coordinates are in the CRS of the file.
- A user-defined CRS with no EPSG code shows its GeoKeys, but no EPSG number.
- Pages compressed with ZSTD, LERC, WebP or JPEG 2000 list their tags but are not decoded.
- Files over 1 GB show the tags of every page but no pixels (setting
tiffViewer.maxFileMB).
Other options
- gdalinfo. Free.
gdalinfo file.tifprints the CRS, origin, pixel size, corner coordinates and nodata value as text. - QGIS. A free desktop GIS. It shows the raster on a map, with reprojection and the Identify tool for pixel values.
Install counts and Open VSX status were checked on 12 November 2026. Descriptions in quotes are the extensions' own.
Questions
Does it need a network connection?
No. It reads the tags from the file and loads no map tiles, so nothing is downloaded.
Is the value in the readout the colour on screen?
No. It is the stored value of the pixel, such as 1125.17 metres in an elevation model.
Is it free?
Yes. Viewing, the GeoTIFF section and the coordinate readout are free. Only Export pages, Region Statistics and Batch convert are Pro, with 3 free tries each.
Does it work in Cursor or Windsurf?
Yes. Cursor, Windsurf and VSCodium install extensions from Open VSX. Search for the extension in their Extensions view and install it there.
More about TIFF Viewer
Read the TIFF Viewer page for every feature and setting, or the source code on GitHub.
Related guides
- TIFF Viewer & TIF Viewer on the VS Code Marketplace (also on Open VSX). Opens TIFF and GeoTIFF images, 16-bit included, in VS Code.
- Convert TIFF to PNG without losing quality
- View STL files in VS Code
- Open DICOM and NIfTI files in VS Code
- Calculate the volume of an STL file
Zovo Pro and support
Zovo Pro: USD 19 once, every Zovo viewer. It turns on the Pro tools in this extension and in the other Zovo extensions you use. The free features stay free.
After a card payment your license key shows on the next page. Paste it with the command "Zovo Pro: Enter a key".
You can also support the work with no Pro:
Need your format supported?
Open a format request with a sample file, and I reply there whether it can be done. For USD 299 once, through this GitHub Sponsors tier, I add your file format or a missing feature to this extension, with tests, within 7 days.